© 2015 X2Engine Inc.
Difference between revisions of "Software Updates and Upgrades"
(→Using the Automatic Updater) |
(→Update Notifications) |
||
| Line 20: | Line 20: | ||
[[File:Update Notification.png|200px|frame|right|System flash message displaying software update notification.]] | [[File:Update Notification.png|200px|frame|right|System flash message displaying software update notification.]] | ||
To get notified of software updates, unless already using X2CRM Professional Edition, one must first "subscribe" to them. This can be done via checking the box "Notify me of software updates" in the installation form. If X2CRM is already installed, this can be done by going to "Updater Settings" from the Admin page and enabling them. If using Professional Edition, these steps are not not necessary. | To get notified of software updates, unless already using X2CRM Professional Edition, one must first "subscribe" to them. This can be done via checking the box "Notify me of software updates" in the installation form. If X2CRM is already installed, this can be done by going to "Updater Settings" from the Admin page and enabling them. If using Professional Edition, these steps are not not necessary. | ||
| + | |||
| + | Once that has been completed, set the update notification interval as desired in "Updater Settings". | ||
= Update Methods = | = Update Methods = | ||
Revision as of 01:03, 7 December 2013
This article (currently in progress) covers the following two operations:
- updating
- Bringing an installation of X2CRM to the most recent available version
- upgrading
- Converting an existing X2CRM installation to Professional Edition
Introduction
The following things happen in typical a software update or upgrade:
- Files that are new in the new version are added
- Files that have been changed in the new version are replaced with the new versions of those files
- Files that are no longer used in the new version are deleted
- Changes to the database are made to make the database compatible with the latest version of X2CRM
- X2CRM data caches are cleared
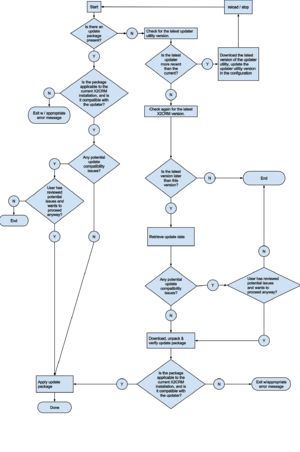
These operations are typically handled by the updater utility (UpdaterBehavior) and controlled via the in-app web-based updater or the command line updater. This article will cover both how to use said interfaces to the updater, and how to perform updates manually if the need arises, in addition to troubleshooting and recovering from an update that did not complete cleanly.
Update Notifications
To get notified of software updates, unless already using X2CRM Professional Edition, one must first "subscribe" to them. This can be done via checking the box "Notify me of software updates" in the installation form. If X2CRM is already installed, this can be done by going to "Updater Settings" from the Admin page and enabling them. If using Professional Edition, these steps are not not necessary.
Once that has been completed, set the update notification interval as desired in "Updater Settings".
Update Methods
Using the Web Updater
The web updater can be accessed using the link in the notification message at the top of the window in versions later than 3.5.5, or by going to the Admin page and clicking the "Update" button at the top, in earlier versions.
Advantages
It is generally quicker and easier to use, and it does not require shell/SSH access to the web server.
Disadvantages
It is not recommended for use on large installations of X2CRM, i.e. containing over a million records.
Explanation
The inherent weakness of the web updater (or any web-based updater to any web application) is that it must always rely upon web requests to the server, and it thus must perform extremely critical operations for the update all within the scope of a web request. Web requests, it goes without saying, are not always reliable. For example, one's internet connection might get cut off due being on a wireless network and encountering interference. Furthermore, if any operations take an exceedingly long amount of time, e.g. because of the size of the data set on which the update must operate, the web request for those operations may take longer than the configured server timeout (maximum request time). This would potentially cut short the execution of a critical update stage, and thus the update would require manual completion and recovery.
How to use
First, navigate to the web updater page, and do not cancel (stop or hit your browser's "back" button) until the page has loaded. If the updater utility has undergone changes and needs to self-update to be compatible with the software updates server, this is when it will do so.
There are three ways of getting to the updater page. One is to simply click the link given in the update notification flash message, if available. The other is to click on the "Update" button at the top of the admin page. If software update notifications are not enabled, one can manually check for and install an update by going to "Update X2CRM" under "System Settings" in the Admin page.
Next, make a backup of the database (recommended), follow the instructions on the page, and click the "Update" button when ready.
Using the Command Line Updater
This update method uses all of the same thoroughly-tested underpinnings and processes as the web updater, but does so all within a system command to the Yii console.
Advantages
Safer to use, especially for large, mission-critical systems. The success of a software update or upgrade does not hinge upon a web request completing successfully.
Disadvantages
More difficult to use; requires shell access to the web server. The console command must be run as the same system user that owns all the files and directories of X2CRM, in order to circumvent permission issues.
How to use
While in via SSH, or in a terminal emulator, or in a script, run the following command in the protected subdirectory of X2CRM:
./yiic update app
Note the following optional arguments to the command line updater:
- --force
- Use "1" for this option (i.e. --force=1) to proceed with the update even if compatibility issues were detected. Default: 0 (halt if compatibility issues were detected).
- --backup
- Use "1" to specify that a database backup should be performed first before updating, "0" to proceed without creating a backup first. Default: 1.
- --lock
- Use "1" to specify that the application should be locked during the final installation of the update package to prevent use, "0" to permit use even when changes to the app are being applied. Default: 0.
If running the command gives you the following message:
The updater is now up-to-date and compliant with the updates server. Re-run the command to proceed.
That indicates that the updater first needed to self-update, and succeeded in doing so. You should then run the same command again to complete the update.
Using the Automatic Updater
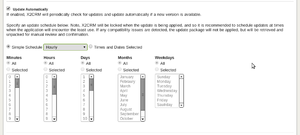
This method uses the command line updater, but runs the command on your behalf using the local cron[[wikipedia:Cron]]: a job scheduler for UNIX-like operating systems daemon. To configure, go to the Updater Settings Page, check the box titled "Update Automatically", and save. If you have Professional Edition, you can manage the update schedule in addition to other automated tasks from the Cron Table settings page, which can also be found under "System Settings" in the Admin page.
Advantages
Automates the entire process of updating.
Disadvantages
Only available on UNIX-like systems that have a cron[[wikipedia:Cron]]: a job scheduler for UNIX-like operating systems daemon, and which permit user access to the cron[[wikipedia:Cron]]: a job scheduler for UNIX-like operating systems table.


