© 2015 X2Engine Inc.
Permissions System
Contents
Introduction
Warning: This article is under construction.
Assignment and Visibility
The assignment of a record is controlled by the assignedTo field. This may be a value such as "Anyone", a username, or a group ID. Record visibility is controlled by the visibility field, which at the time of writing can take the following integer values (see X2PermissionsBehavior for more details):
| Value | Visibility | Description |
|---|---|---|
| 0 | Private | This visibility value implies "private"; ordinarily visible only to assignee(s)/owner(s) of the record |
| 1 | Public | This visibility setting implies the record is public/shared, and anyone can view. |
| 2 | Groups | This visibility setting implies that the record is visible to the owners and other members of groups to which the owners belong ("groupmates"). |
Hidden Records
When a record is assigned to 'Anyone' and given private visibility, the record becomes hidden from the UI, even for the admin user. This function is ordinarily used by the duplicate checker after the duplicates have been resolved. The data for the records is still present in the database, and can still be viewed and updated manually. In X2CRM version 6.5.3, a tool has been added to find records that may have been inadvertently hidden.
Roles and Permissions
Within X2CRM, each user may be assigned one or more Roles. Each of these Roles are associated with different groups of permissions. Each permission represents a different operation, such as viewing a record.
To configure module access for a particular role, first navigate to the admin panel, then view the "Edit Role Access" page under the User Management section.
Each of the roles can be granted granular permission for the following actions:
- View
- Create
- Update
- Delete
- Admin
The View, Update, and Delete actions can additionally be restricted to only those that are assigned to the user. Currently, only roles with Admin permission for a module can perform record import and export.
Adding a Custom Permission
When adding custom actions to any of the controllers, it is likely that you will want to limit access using the permissions system. For standard controllers, e.g., those under protected/controllers, you can add custom access rules by modifying the accessRules() method of the controller. The 'users' definition describes which users have the ability to access that action. To limit access to a particular user, such as "admin", you would specify their username directly. To allow all users (including guest) to use the action, specify an asterisk ("*"). For example, to allow guest access for a new controller method actionTest(), one would add the following access rule:
array('allow',
    'actions' => array('test'),
    'users' => array('*'),
),
Please see the page on the Customization Framework for more information about safely persisting your customizations through updates.
The access control in modules is handled a bit differently. While in standard Controllers you can use the accessRules() method to define the rules, the custom module system in X2CRM requires authorization rules to be loaded dynamically. To add a permission for a new custom module action, you'll want to instead add the necessary auth items and their relationships to the auth graph. The auth items themselves are stored in the x2_auth_item table. These are then associated with their appropriate parent permission with the x2_auth_item_child table. For example, in adding guest access to the actionTest() method of a Testmodule controller, one would insert the following database records:
INSERT INTO x2_auth_item (name, type, data) VALUES ('TestmoduleTest', 0, 'N;');
INSERT INTO x2_auth_item_child (parent, child) VALUES ('GuestSiteFunctionsTask', 'TestmoduleTest');
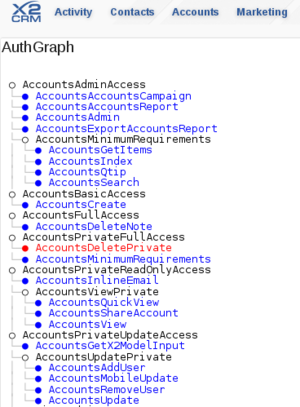
Verifying Permissions with the Auth Graph
After modifying or adding custom authorization rules, it may be helpful to visualize the current state of the authorization graph. This can help decide where a new permission belongs or catch inadvertent granting of permissions. As the administrator, navigate to /admin/authGraph. You will be presented with a listing of the various permissions, as well as their relation to their children.

