© 2015 X2Engine Inc.
Configuring External Reports
Beginning with version 6.1, the reporting module was expanded to support the use of external reports provided by a Jasper Reports server. While the reporting module supports a wide array of functionality, sometimes you might want to report on data that may not yet be conveniently aggregated with the controls. In this case, you may choose to create external reports using Jasper Reports, a widely popular reporting tool. Reports are designed within Jasper Studio, a fork of the Eclipse IDE, before being published to the Jasper server for rendering and embedding. You can download the Jasper Studio installer for your operating system on the Jasper Studio releases page.
Adding a Data Source
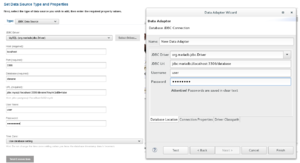
The Jasper Reports server and Jasper Studio tools utilize what are known as "data sources." Each data source represents a connection to an external database, such as your X2CRM MySQL database. To add a data source in the Jasper Server, right-click in your directory tree, and select "Add Resource" > "Data Source." Make sure you are using a JDBC data source with the MariaDB open source MySQL driver, then populate the connection details with the user, password, and hostname for your database, before testing the connection and saving the data source.
To add a data source in the Jasper Studio, right-click on the data adapters entry in the Repository Explorer, then select "Create Data Adapter." Choose a database JDBC connection, select the MySQL driver, and populate the form with your connection details. Data sources can also be imported from the Jasper Server. However, one detail to keep in mind is that the password for the data source will not be imported, so you'll be required to enter it manually.
Creating and Publishing a Report
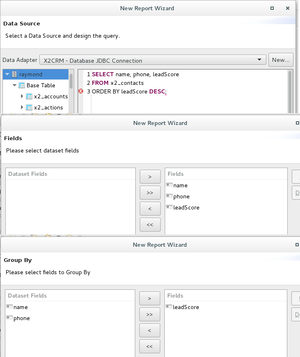
To design your first report, first download and install the Jasper studio tool. Before creating the report, you will need to add your database as a data source. Then, select "File" > "New" > "Jasper Report." Choose a report template and hit next, enter the path you would like the report to be saved, and then select your data source. Next, you'll want to provide at least a basic SQL query so that Jasper Studio can automatically discover the available fields on your table, such as:
SELECT * FROM x2_contacts;
If you already know which fields you want to report on, provide them in the SELECT clause, or enter a more advanced query, for example joining with another table. On the next window, you'll be provided with a multiselect where you can choose which fields to include in the report. If you've already restricted your fields with the query, you can simply use the ">>" button to add all fields. After proceeding, you're given the option to group by certain fields if necessary, before finishing the wizard. Finally, you can customize the appearence of your layout on the template, such as setting the headers or moving layout elements like the page number.
After you've customized your report according to your needs, you can publish the report to the Jasper Server for convenient viewing and embedding. With your Jasper report tab selected within Jasper Studio, select "Project" > "Publish the file on JasperServer." Then, expand the server you would like to publish to, and select the path to store the report before proceeding. You'll be prompted for which data source to use when executing the report. If you've already connected your data source to the Jasper Server, then you can select "Data Source from Repository," then press the ellipses button to select from available data sources.
Embedding a Report in X2CRM
Before any actual reports can be embedded within your CRM, you must create your Jasper Server credentials. First, add the Jasper Server to your repository by right-clicking on the "Servers" option under the "Repository Explorer" pane and selecting "Create JasperReports Server Connection." Populate the form with your Jasper Server details, test the connection, and save.
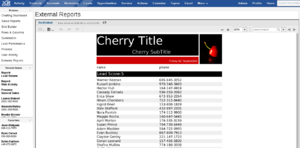
Next, navigate to the X2CRM admin panel, then select "Jasper Server Integration." Supply the URL of your Jasper Server instance, username, and password, before saving the credentials. It is recommended to create a new ordinary user to connect to the Jasper server, instead of connecting as the Jasper admin. Then, navigate to the reports module and select "External Report." Enter the full path to your report on the Jasper Server, which can be found by right clicking on your report in the Jasper Server UI and selecting "Properties." Finally, you can save the report to have it appear in your saved reports grid.


